Sunday 22 December 2013

Sizzix Christmas Wreath Ornament

 
Well its nearly here for another year and I've been busy making a few Christmas decorations for hanging on the tree using my trusty Sizzix machine and various dies.  I used a wreath die for the base cut in white card - coloured in using my Copic pens then added a poinsettia cut using the Tattered Lace Small Poinsettia die (I shaped the petals using a foam mat and a ball end pointer).  I added a holly leaf and a couple of pine sprigs (Memory Box die).
 
I stamped the saying on  card scrap and cut out.  I attached everything using my glue gun and they look fabulous hung on the tree.
 

Later

Sue
X

Monday 16 December 2013

Christmas Ginger Snowflake Cookie

I was up at the crack of dawn yesterday and decided it was Christmas Cookie baking day - not something I do very often.  I had found a great recipe for Ginger Biscuits on the Sainsbury's website here's a quick link to the recipe and I think they turned out great.  The recipe has chopped stem ginger in it and boy is it good - very Moorish and very addictive.


Wonder how these would sell at a craft fair?  Perhaps next year I shall investigate putting a stall on at one of the local fairs for all the Christmas decorations, Christmas bakes and Christmas pickles I could make:)

Off to make a coffee and perhaps a ginger biscuit or two to go with it.

Later

Sue
X

Saturday 14 December 2013

My New Crafting Toy - We R Memory Keepers - Envelope Punch Board

 
Come on -  own up - haven't we all made a card without measuring only to find when you have finished it that you don't have an envelope to fit it properly.  I know I have done it time and again - I then had to spend at least another hour while I mess about making one to fit.  So frustrating.
 
Well that has become a thing of the past as I recently purchased a We R Memory Keepers - Envelope Punch Board and it has revolutionised my card making.  I no longer have to worry about what size card I make as I'm easily able to create a very professional looking envelope to fit all my cards.  It's so quick - less than 5 mins to complete each envelope.  M A G I C :)
 
 
It is so simple to use just measure your card, read off the measurements for the paper size required and score along the guidelines.  Fold and apply a touch of glue to hold it all together and there you go - even I managed it without any problems (and I get very technically challenged when shown a set of instructions lol).


A great crafting tool for the serious crafter.

See you later

Sue
X

Tuesday 10 December 2013

Christmas Bauble Card

 
I was going to post this Christmas card last week but unfortunately I was taken into hospital and was unable to.  I was only in three days but I had a operation and came out feeling really sore and out of sorts.  I'm feeling a little better and as Christmas is rapidly approaching I thought I better get on with my cards - so here is one of the first ones I have made this year.


I made this at the last Craft Club I went to using the free stamps that came attached to a recent craft magazine I bought.  I coloured it in using Copic Makers, trimmed the card and layered it onto black card before mounting onto a white card and stamping a Christmas greeting.

 
I was rather pleased with the finished result and hope to make a few more to send out.

Back soon with more Christmas offerings to show you.

Thanks for looking.

Sue
X

Saturday 30 November 2013

Ribbon Wreath


I had a real fun day yesterday - playing all afternoon in my craft room and here is the end product.  I previously posted about a ribbon wreath I came across in a local garden centre at an eye-watering £24.99 and decided to have a go at making my own when I had a bit of time to play. 


I came across some lovely red and gold Christmas ribbon rolls in Lidl at a reasonable price of £1.00 a roll for 5 metres and I managed to find a polystyrene wreath in Hobbycraft for a couple of pounds.  I covered the wreath with red tissue paper, made loads of ribbon circles and using my new best friend - my glue gun I attached them to the wreath.  Dead easy peasy:-))
 
The whole thing caused me less than £7.00 and I have loads of ribbon left to make several more.
 
Back again soon 
 
Sue
X


Sunday 24 November 2013

Amigurumi Crochet Sleepy Lamb

I'm sorry I've been offline over the last week but I had an unexpected trip across to the Isle of Man to visit my beautiful 10 month old granddaughter.  It was a lovely visit apart from some rather stormy weather which blew in bringing snow and storm force winds - in fact  the ferries back to the mainland were cancelled on my return and we had a long wait until they started running again.  I took over all the Christmas gifts and as a little extra for Evie-Rose I gave her the sleepy lamb I made from a pattern I found on Harugurumi's Free Sleepy Lamb Pattern . 


Posted by Picasa

I'll be back with more news tomorrow.

Sue
X
 

Sunday 17 November 2013

Felt Heart and Star - Christmas Decorations

 
I found the patterns for these felt decorations in a craft magazine I bought a while ago and decided to have a go - although it is easy enough to .  They were very easy and I added the button middle and the beads on the ribbon hanger as I just felt they needed something extra.  I think they will look rather lovely on our Christmas tree this year.  The red bead started life as a wooden bead necklace that I bought from a charity shop (very cheap) - I took it apart and painted a couple - first with red acrylic paint and then clear sealant.  It worked really well and I've still got loads of wooden beads left.

I will be back with a few more decorations I've been playing with over the last week - made using my trusty Sizzix machine - I don't know what I would do with out this machine I use it all the time - in fact I'm just a bit fanatical about it and Bazzer is trying to stop me buying anymore dies but I'm not listening he he.  (Roll on the after Christmas Sale Sizzix  - always lots of bargains to be had).

Anyway it's late so I'm off to bed - Good night all.


Sue
X

Friday 15 November 2013

Christmas Ribbon Wreath

I went to a local garden centre today and came across this wonderful Christmas Ribbon Wreath.  It was just so simple but so effective.


I'm going to have a go at this and I'm off looking for a polystyrene wreath tomorrow.

Sue
X

Thursday 14 November 2013

Zentangle Pattern I love this one


One of my minor passions is Zentangling and I just love the patterns you can make.  I find it so relaxing and if I'm feeling really stressed I get my black Micron Pen out with an ATC sized piece of white card and set off on a journey into the land of Zentangle.  In fact - I just zone out.  Its a fantastic way to chill out.
 
I'm always on the look-out for new Zentangle patterns and today I discovered this little beauty created by Michele Beauchamp on her blog Shelly Beauch.
 
Check it out Michele blog as she creates some beautiful work.
 
Catch you later - I've got a job interview tomorrow so I'm off to swat up on the company.  Fingers crossed.

Sue
X

Wednesday 13 November 2013

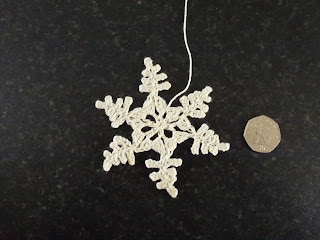
Crocheted Snowflakes


The other day I bought a magazine that had a free crochet pattern for a pretty little snowflake and I made it that day - I liked it that much I made another.  In fact it then sent me off on a search on the old internet as I decided to crochet up a blizzard.  I get a bit obsessive sometimes:-)


I found an amazing blog site called Snowcatcher  where every Monday a new snowflake pattern is posted and there are a fantastic selection of Snowflake Patterns for you to use.  I have added the link and hope you'll pop over and have a look - maybe  crochet your own blizzard.


I'm going to make a few more and make a snowflake garland - I think it will look really cool on my Christmas Tree this year.


Monday 11 November 2013

Pumpkin Carving

 
As promised here are the pumpkins carved for 2013 by myself and a couple of pals. 
 
As usual I went to my good friend Jan's house and we just sat and carved our pumpkins - Jan's sister Pat joined us and we all enjoyed a good gossip with much laughter.  It was a great night and I think the results speak for themselves.


I carved the face and the Raven, Jan carved the Pumpkin Scarecrow, Pat carved the Witch and the Stacked Pumpkin Heads were carved by Jan's Daughter Emily who couldn't be with us that evening but wanted her pumpkin to be in the picture. 

 
Posted by Picasa
 
The bad news was we had to travel down to Kent on Halloween - it was the first year in the 35 years we have lived in our house that we were not at home and to say I was devastated when Baz told me we were off to visit his mum is an understatement (not because it was his mum just because I would miss all the festivities - I love all the kids dressing up).  I donated my carved pumpkins to Jan as I know she always goes over the top when she decorates her house and scares all the kids that call to death.  I knew she could make good use of them and she did.


Saturday 9 November 2013

Halloween Cards

I've finally got around to uploading the Halloween Cards I made this year and posted out to my US penfriends I have also got some  pumpkins we carved to post and hopefully they will be on tomorrow.  We were actually away over Halloween so I wasn't at home to decorate the house this year -  I was gutted when  Barry told me we had to go to visit relatives in London that weekend  I'm not really complaining as we had a lovely time seeing everyone and we also took the opportunity to deliver Christmas presents (I know it's early but hey we were really organised)
 
It has been a tough week this week since we got back.  Without going into details  I've finally got a date for my hospital visit - Hopefully things will soon be back to normal.
I'm busy working on some Christmas decorations and will post once they are completed.
 
Thanks for looking.
 
Sue
X

Thursday 24 October 2013

Autumn Colour - Day 3

Here's the Acer today glowing in the morning sunshine - it was very summer like today and I managed to get all my washing out and dried.  Tomorrow is now designated ironing day - YUCK.  I hate ironing with a passion but if I don't do it nobody else will.
 
No crafting to show today although I have been crocheting some snowflakes this evening and when I have enough I'm going to string them together and make a garland for the Christmas tree.
 
To be shown at a later date.
 
I have also cut out a small felt reindeer that I will hand sew together also for our tree if it looks ok.
 
I'm off to bed as it's getting late
 
Sue x
Posted by Picasa

Wednesday 23 October 2013

Amigurumi Mini Kitty Cat


Well here it is - this little cutie is the first animal Amigurumi I attempted - it is from a Sara Scales pattern that was published in a UK craft magazine that a friend gave to me and I copied the pattern before giving her the magazine back.  All the instructions are in UK Crochet terms.

Kitty cat is about 2.5 inches tall using double knit wool.  The original pattern used Anchor Pearl Cotton but I just made with what I had and it turned out ok.  (I have since learnt to put a 20p piece in the photo to give a bit of scale to the figure).

I have added the pattern below - please credit it to Sara Scales should you chose to use it.
 
Sue
X
Posted by Picasa
Cute Mini Crochet Kitten Pattern

Wool - I used Double Knit (or us Pearl Cotton No 8)
Smallish Crochet Hook (I used 3.00mm hook) or 1mm if using Pearl Cotton No 8

Body
Rnd 1 Create a slip knot, ch 2.
Rnd 2 6 dc into the 1st ch.
Rnd 3 2 dc into each st.  (12sts)
Rnd 4 2 dc into each st.  (24sts)
Rnd 5 - (1 dc in next dc, dc2inc), rep around, place marker.  (36sts)
Rnd 6 to 9 dc around.
Rnd 10 (dc in next 2 dc, dc2tog), rep to marker. (27sts)
Rnd 11 (1 dc in next dc, dc2tog) rep to marker. (18sts)
Rnd 12 to 14 dc around to marker.
Rnd 15 (1 dc in next dc, dc2tog) to marker. (12 sts)
Stuff the body with toy stuffing.
Rnd 16 dc2tog around until the hole is closed.
Fasten off.  Leave tail of approx. 15cm.  Thread the yarn tail through yarn needle.  Close any gap left at the top then thread remainder through the body of the kitten and trim.

Ears (Make 2)
Rnd 1 Create a slip knot, ch 4.
Rnd 2 Turn work, dc into 2nd ch from hook, dc into 3rd ch.
Rnd 3 Turn work, and dc2tog.
Fasten off leaving a 15cm tail.

Tail
Row 1 Create a slip knot, ch 10.
Row 2 Turn work, dc into each chain.
Fasten off leaving a 15cm tail.
Using the yarn tails attach ears and tails into place on the body using mattress stitch.  Embroider nose and whiskers using black thread and embroider two eyes using green thread.
This is a Sara Scales Amigurumi Pattern that was published in a UK craft magazine unfortunately I can’t remember which one and I have only got a copy of it.

Autumn colours - Day 2

As promised here is todays photo of the Acer tree in our back garden.  Still glowing a beautiful shade of red.

Back later with an Amigurumi pattern for a cute mini kitty cat.
Posted by Picasa

Monday 21 October 2013

Autumn Colours

I have a little Acer tree in our small sized back garden (think postage stamp sized and then half it!!!)  this lives in half  a small wooden barrel as there is no depth of soil for it to grow in. 

In previous years it has tried its' best to put on an Autumnal  display but it has always been a little disappointing.  Well this year my little Acer has been absolutely magnificent - such  beautiful shades of red - a beautiful rich vibrant red that just glows.

In fact it seems to change by the hour and I have decided I am going to post a picture taken every day as long as the display lasts.

So this is day 1.

Nature is just wonderful.

Enjoy

Sue
X
Posted by Picasa

Sunday 20 October 2013

Amigurumi Pumpkin

I did say I would post Halloween /cards today but I have had a change of plan as the cards are still in the development stage - I have the design sorted I just need to make the final version - that's tomorrows job.

So I thought as it is nearly Halloween I would post a couple of pictures of a super cute Amigurumi pumpkin I finished last week.  I found the pattern on Planet June blog and I have added the link if you fancy having a go at making your own.  The only difference is the addition of a couple of leaves I made - you could also add Halloween faces if you fancy with felt or beads.

The pattern is in US crochet terminology but it is so easy to convert to UK and can be crochet in an evening.

Any problems just send me a message and I will try to help but there are lots of conversation tables to be found on the internet.


See you later

Sue
X


Posted by Picasa

Friday 18 October 2013

An Excess of Apples

This year appears to be a great year for English fruit and on our way back from Plymouth last week we called in to visit my Auntie Mag and Uncle John in Exmouth.  We had a lovely visit and Auntie Mag asked me if I would like some apples to take home as they had so many and we were given 2 huge bags of beautiful Blenheim Apples.  I was originally going to freeze them but I found there wasn't enough room in my freezer so I made an apple pie and wondered what was I going to do with the rest.
 
Well after much deliberation and browsing the internet I came across some great recipes for Apple Chutney and Tomato & Apple Chutney and decided to have a go - I remember my Mum and  my Nan always made chutney and pickles - in fact my Mum's Piccalilli was legendary in the family. 
 
Anyway this afternoon I got stuck in and made the two different batches of chutney and I'm really pleased they have both turned out really good - just like an old fashioned pickle.  I have put links to the original recipes.

 
The eight jars on the right are the Tomato & Apple Chutney and the jars next to the pumpkins are the Apple Chutney.  I have just found recipe for Pumpkin Relish and think I might have a go at that next or even Pickled Onions or perhaps both.
 
I even managed to get a beef casserole in the oven in between stirring the chutney so that's tomorrow's tea sorted - how's that for being organised.
 
Tomorrow has got to be devoted to Halloween Cards to send to my American penfriends - I should have started them last week but the week got away from me.  I will post as soon as I have them finished.
 
Anyway it's getting late so I'm off to bed.
 
Night Night
 
Sue
x

Wednesday 16 October 2013

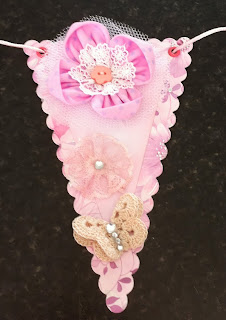
Special Bunting for a Special Little Girl


Well I know it's been a little while but I final got round to posting these pictures of bunting I made for a friends' granddaughter. 
 
I die cut the pennants tinted them with Tim Holtz inks and made all the decorations.  There are fabric flowers, crochet butterflies and paper rosettes plus loads of gems.  Finally I die cut Halle's name using Tim Holtz Vintage Market alphabet - strung them all on cord and secured with hot glue on the back of each flag.  It now resides in Halles' bedroom.
 
I'm sorry the pictures are a bit pants but I just could get the camera to behave!!!!!
 
Back soon with something different I've been working on.
 
Sue x


Posted by Picasa

Friday 30 August 2013

Morecambe Seaside Festival Weekend


After swimming this morning I was heading home driving along the promenade when I noticed these two ladies dressing the statue of Eric Morecambe.  I parked up and wandered across to see what they were up to and they were promoting the Seaside Festival on over this weekend but a Vintage Fair weekend on the 14th September at the wonderful Art Deco Midland Hotel - must remember to pop along as it sounds like a good day. 

Looking forward to seeing the firework displays tomorrow and on Sunday night - I  just love firework displays.

Bye for now

Sue
Posted by Picasa

Wednesday 28 August 2013

How time flies!

Well the title says it all - summer is almost over and what an eventful summer it has been.  I went back to work at the beginning of May after my hip operation and after a couple of weeks back I was made redundant. This was a week after my 60th birthday what a wonderful present - nothing like feeling a valued member of the workforce!

Anyway enough bitterness - it has been a wonderful summer as the weather has been fantastic and I have a suntan for the first time in years.  I have managed to go swimming most days and have acquired a push bike - well its a trike as I can't balance on two wheels - I need the stability of the third wheel. It's turning out to be great fun I really enjoy riding up the promenade at Morecambe in the sunshine - not too sure how it will be in the winter when the cold wind is blowing - lol.
 
Here is the latest picture of our lovely granddaughter Evie-Rose - I had a flying visit across to the Isle of Man a couple of weeks ago.  She is such a happy little one always smiling.

 
Posted by Picasa
 
I have been making a few cards as I have a little time on my hands.  This was the one I made using the free stamps on this months Simply Cards & Papercraft Magazine
 
 
Hopefully I will be back in the not too distant future.
 
TTFN
 
Sue
 

Saturday 20 April 2013

Log Cabin Patchwork Quilt

Hello everyone at last it looks like Spring is here as the sun is shining and the swallows have arrived back and are busy building nests.

Another delay in blogging - I dont' know where the time goes - well I do really. I have been busy finishing off the Log Cabin Quilt I started for our new grandaughter and I have finally done in and here it is.


I was so pleased with it as I haven't done any patchwork in over 30 years and was a little worried as I didn't follow a pattern just set off making squares.  It all went together so easily even the backing went on flat with no problems.  I even managed to remember to sign it.


I filled fired with enthusiasm for all things sewing and have plans to make a wall hanging next maybe even a skirt as I can't find anything in the shops I like at the moment.

I'm so sad as my local craft shop has become the latest victim of the recession and is closing it doors at the end of April and it will be so missed by the all the local crafting people. It must be so hard trying to run a business in todays economic climate.

I'm off into town to look at skirt patterns and fabrics.  Hope the Spring weather lasts over the weekend

Thanks for looking.


Wednesday 13 March 2013

Nearly 12 months OMG

Well I can't believe it is nearly 12 months since I last posted here.  Where has the time gone?

I apologise for my shoddy blogging and will try to keep it up in the future.  I have recently been in hospital and at the moment am off work - I have had my right hip replaced 3 weeks ago so I have plently of time on my hands.

I have recently taken up patchwork again after a break of about 35 years.  Lol.  I have nearly finished a baby quilt for my new grandughter Evie-Rose who was born at the end of December and will post pictures of the quilt when I have completed it.