Thursday, 24 October 2013

Autumn Colour - Day 3

Here's the Acer today glowing in the morning sunshine - it was very summer like today and I managed to get all my washing out and dried.  Tomorrow is now designated ironing day - YUCK.  I hate ironing with a passion but if I don't do it nobody else will.
 
No crafting to show today although I have been crocheting some snowflakes this evening and when I have enough I'm going to string them together and make a garland for the Christmas tree.
 
To be shown at a later date.
 
I have also cut out a small felt reindeer that I will hand sew together also for our tree if it looks ok.
 
I'm off to bed as it's getting late
 
Sue x
Posted by Picasa

Wednesday, 23 October 2013

Amigurumi Mini Kitty Cat


Well here it is - this little cutie is the first animal Amigurumi I attempted - it is from a Sara Scales pattern that was published in a UK craft magazine that a friend gave to me and I copied the pattern before giving her the magazine back.  All the instructions are in UK Crochet terms.

Kitty cat is about 2.5 inches tall using double knit wool.  The original pattern used Anchor Pearl Cotton but I just made with what I had and it turned out ok.  (I have since learnt to put a 20p piece in the photo to give a bit of scale to the figure).

I have added the pattern below - please credit it to Sara Scales should you chose to use it.
 
Sue
X
Posted by Picasa
Cute Mini Crochet Kitten Pattern

Wool - I used Double Knit (or us Pearl Cotton No 8)
Smallish Crochet Hook (I used 3.00mm hook) or 1mm if using Pearl Cotton No 8

Body
Rnd 1 Create a slip knot, ch 2.
Rnd 2 6 dc into the 1st ch.
Rnd 3 2 dc into each st.  (12sts)
Rnd 4 2 dc into each st.  (24sts)
Rnd 5 - (1 dc in next dc, dc2inc), rep around, place marker.  (36sts)
Rnd 6 to 9 dc around.
Rnd 10 (dc in next 2 dc, dc2tog), rep to marker. (27sts)
Rnd 11 (1 dc in next dc, dc2tog) rep to marker. (18sts)
Rnd 12 to 14 dc around to marker.
Rnd 15 (1 dc in next dc, dc2tog) to marker. (12 sts)
Stuff the body with toy stuffing.
Rnd 16 dc2tog around until the hole is closed.
Fasten off.  Leave tail of approx. 15cm.  Thread the yarn tail through yarn needle.  Close any gap left at the top then thread remainder through the body of the kitten and trim.

Ears (Make 2)
Rnd 1 Create a slip knot, ch 4.
Rnd 2 Turn work, dc into 2nd ch from hook, dc into 3rd ch.
Rnd 3 Turn work, and dc2tog.
Fasten off leaving a 15cm tail.

Tail
Row 1 Create a slip knot, ch 10.
Row 2 Turn work, dc into each chain.
Fasten off leaving a 15cm tail.
Using the yarn tails attach ears and tails into place on the body using mattress stitch.  Embroider nose and whiskers using black thread and embroider two eyes using green thread.
This is a Sara Scales Amigurumi Pattern that was published in a UK craft magazine unfortunately I can’t remember which one and I have only got a copy of it.

Autumn colours - Day 2

As promised here is todays photo of the Acer tree in our back garden.  Still glowing a beautiful shade of red.

Back later with an Amigurumi pattern for a cute mini kitty cat.
Posted by Picasa

Monday, 21 October 2013

Autumn Colours

I have a little Acer tree in our small sized back garden (think postage stamp sized and then half it!!!)  this lives in half  a small wooden barrel as there is no depth of soil for it to grow in. 

In previous years it has tried its' best to put on an Autumnal  display but it has always been a little disappointing.  Well this year my little Acer has been absolutely magnificent - such  beautiful shades of red - a beautiful rich vibrant red that just glows.

In fact it seems to change by the hour and I have decided I am going to post a picture taken every day as long as the display lasts.

So this is day 1.

Nature is just wonderful.

Enjoy

Sue
X
Posted by Picasa

Sunday, 20 October 2013

Amigurumi Pumpkin

I did say I would post Halloween /cards today but I have had a change of plan as the cards are still in the development stage - I have the design sorted I just need to make the final version - that's tomorrows job.

So I thought as it is nearly Halloween I would post a couple of pictures of a super cute Amigurumi pumpkin I finished last week.  I found the pattern on Planet June blog and I have added the link if you fancy having a go at making your own.  The only difference is the addition of a couple of leaves I made - you could also add Halloween faces if you fancy with felt or beads.

The pattern is in US crochet terminology but it is so easy to convert to UK and can be crochet in an evening.

Any problems just send me a message and I will try to help but there are lots of conversation tables to be found on the internet.


See you later

Sue
X


Posted by Picasa

Friday, 18 October 2013

An Excess of Apples

This year appears to be a great year for English fruit and on our way back from Plymouth last week we called in to visit my Auntie Mag and Uncle John in Exmouth.  We had a lovely visit and Auntie Mag asked me if I would like some apples to take home as they had so many and we were given 2 huge bags of beautiful Blenheim Apples.  I was originally going to freeze them but I found there wasn't enough room in my freezer so I made an apple pie and wondered what was I going to do with the rest.
 
Well after much deliberation and browsing the internet I came across some great recipes for Apple Chutney and Tomato & Apple Chutney and decided to have a go - I remember my Mum and  my Nan always made chutney and pickles - in fact my Mum's Piccalilli was legendary in the family. 
 
Anyway this afternoon I got stuck in and made the two different batches of chutney and I'm really pleased they have both turned out really good - just like an old fashioned pickle.  I have put links to the original recipes.

 
The eight jars on the right are the Tomato & Apple Chutney and the jars next to the pumpkins are the Apple Chutney.  I have just found recipe for Pumpkin Relish and think I might have a go at that next or even Pickled Onions or perhaps both.
 
I even managed to get a beef casserole in the oven in between stirring the chutney so that's tomorrow's tea sorted - how's that for being organised.
 
Tomorrow has got to be devoted to Halloween Cards to send to my American penfriends - I should have started them last week but the week got away from me.  I will post as soon as I have them finished.
 
Anyway it's getting late so I'm off to bed.
 
Night Night
 
Sue
x

Wednesday, 16 October 2013

Special Bunting for a Special Little Girl


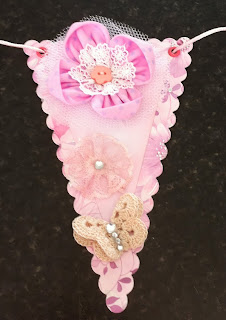
Well I know it's been a little while but I final got round to posting these pictures of bunting I made for a friends' granddaughter. 
 
I die cut the pennants tinted them with Tim Holtz inks and made all the decorations.  There are fabric flowers, crochet butterflies and paper rosettes plus loads of gems.  Finally I die cut Halle's name using Tim Holtz Vintage Market alphabet - strung them all on cord and secured with hot glue on the back of each flag.  It now resides in Halles' bedroom.
 
I'm sorry the pictures are a bit pants but I just could get the camera to behave!!!!!
 
Back soon with something different I've been working on.
 
Sue x


Posted by Picasa